
|
Latest Post
Showing posts sorted by relevance for query How-tos. Sort by date Show all posts
Showing posts sorted by relevance for query How-tos. Sort by date Show all posts
How To Make Window Genuiene(How-tos)


how to unlock the memory card password(How-tos)

*F explorer,download it!
After download the software,follow the below steps.
*Download f explorer in your mobile
*Now run it & go to C drive
*Now you are in c system folder
*Search mmcstore file and copy into your pc
*Open the file with notepad
*When you open the file,you can seee the memory card password.
How to unlock youtube(How-tos)

After goto this site,then in a bottom a space is available.Write a http://www.youtube.com & press "Go" button.Now enjoy the youtube.
The main benefit of this is that the buffering speed is speedier than the youtube.
How to earn and make money by Blogging(How-tos)

For me and maybe many others bloggers has thoughts that to build and to be a successful blogger isn't something that we can get instantly just in one night or in a few days. A blog is to build with focus-mind, effort and energy, it the same as like you build a high-building. But you have to be fun and love with it and enjoy it. Because when you love on what you are doing, you will also attract everything you like. You will see there's many visitors will comes to you, then the money will follows :)
Well, there's so many ways you can find to make and earn money by blogging. Some of them are becoming an ads publisher by using Google Adsense (or another adsense services), affiliate programs, sell E-books, Amazon, and many others. However the most common way used by many bloggers in the world are using Google Adsense to monotize their blog to earn money, as you can see in this blog that until now this post is written almost 100% earnings comes from Google Adsense. If you haven't already Google Adsense account yet, you can easy to register yourself here for free and start earning from blogging. All the payment will be transfered by Google to your account.
Please note that above all, it's better for you to focus on your content rather than earnings. Because Blogging is about to attract/help visitors or readers and make them enjoy to read your blog. Keep posting regulary and be patient, as long as you do Blogging with passion and loving it, you'll be succeed in the future. It is only a matter with time.
If you are confused about to pick up the right topic of your blog, try to ask yourself what is your passionate about? or your what is your hobby? then start it to build with passion. Share with us on comment box below about your first experience in Blogging.
7 Ways to Create an Adsense Account without Having a Website(How-tos)

Google
AdSense is one of the most popular way to make money from Internet by
displaying ads on your web pages. Google AdSense was launched on June
18, 2003 and today there are millions of Google AdSense publishers.
Google easily approves AdSense accounts in most of countries but in
few countries Google hardly approve AdSense applications. The reason
is, applying for an Adsense account through low quality-content
websites. If you are having a website, then you must know how to create
an adsense account successfully within few hours. However, you can get
an AdSense account even without owning a website.
Many people are selling AdSense account by using trick to Create AdSense account immediately. Actually there is no trick behind creating an Adsense account. They just make people fool by creating AdSense account via other websites. Other websites mean those websites who have revenue sharing system. Following are 7 websites which allows you to create an AdSense account. You don't have to pay them for this, just create an account there and apply for your AdSense account.
Many people are selling AdSense account by using trick to Create AdSense account immediately. Actually there is no trick behind creating an Adsense account. They just make people fool by creating AdSense account via other websites. Other websites mean those websites who have revenue sharing system. Following are 7 websites which allows you to create an AdSense account. You don't have to pay them for this, just create an account there and apply for your AdSense account.
1- Blogger.com
Blogger.com
(also known as blogspot.com) is a free blogging service from Google
Inc. This is just like creating a free website on a sub-domain.Blogger
gives you huge space to upload your text contents and pictures plus
gives you so many templates with customization option. Just go to
Blogger.com, create your blog, post some unique articles and Apply for
an AdSense account through their Monetize tab.
Link: http://www.blogger.com/
Link: http://www.hubpages.com
Link: http://www.flixya.com
Link: http://www.docstoc.com/
Link: http://www.bloggerparty.com/
Link: http://www.indyarocks.com/
Link: http://www.webanswers.com/
Link: http://www.blogger.com/
2- Hubpages.com
Hubpages is a website where people post their articles and get paid out of it. Hubpages is a revenue sharing website where you can share your article on any subject and they will pay you for this. You can apply for an AdSense account via their Revenue share system.Link: http://www.hubpages.com
3- Flixya.com
Flixya is another way to create an AdSense account. Flixya is a website to share pictures, videos and blogs and it is powered by Google AdSense itself so there are higher chances of AdSense account approval. Simply signup for an account at Flixya, upload 10 ore more pictures, create a blog and apply for an AdSense account.Link: http://www.flixya.com
4- Docstoc
Its really simple and easy to create an AdSense via Docstoc. Go to Docstoc, upload few documents there such as txt, doc or presentation files. But make sure those files contain some well written form. Simply go to Docstoc, create an account, upload few docs and apply for an AdSense account.Link: http://www.docstoc.com/
5- BloggerParty
This is yet another revenue sharing website. It works like Hubpages. All you have to do is create an account there, share your experience there. When you signup for an account, you will see an option to signup for Google AdSense account through them. Select that option and you will get an account successfully.Link: http://www.bloggerparty.com/
6- IndyaRocks
This is a social network almost like Facebook. Here you can make friends, update your status, share pictures etc. First of all, create an account there and complete your profile. Write 5 blogs at least and when you have done with it simply apply for an Adsense account application.Link: http://www.indyarocks.com/
7- Webanswers
Webanswers.com is just like Yahoo! Answers. People ask questions on various topics and others can answer this. You can get an AdSense account from this website also. Simply go to this website, post answers to some questions.Link: http://www.webanswers.com/
How to Hack Admin password in Windows XP (How-tos)

Step-2 Double click on USERS, Then Right click On the user which you want to change the password.
Step-3 Then click on SET PASSWORD. [Type the same password in both boxes.]
How to find stolen mobile phone with exact location(How-tos)
1. Dial *#06# from your mobile.
2. Your mobile shows a unique 15 digit .
3. Note down this number. As this is the number which will help trace your mobile in case of a theft.
4. Once stolen you just have to mail this 15 digit IMEI number to cop@vsnl.net
5. Your Mobile will be traced within next 24 hrs. via a complex system of GPRS and internet.
6. You will find the exact geological location of your number.
How to Create Virus Using JPS (How-tos)

This can be programmed to do the following things:
Disable Registry Editor
Disable Ms Config
Disable Task Manager
Disable Yahoo! Messenger
Disable Media Player
Disable Internet Explorer
Disable Time
Disable Group Policy
Disable Windows Explorer
Disable Norton Antivirus
Disable McAfee Antivirus
Disable Note Pad
Disable Word Pad
Disable Winows
Disable DHCP Client Service
Disable Taskbar
Disable Start Button
Disable MSN Messenger
Disable Command Prompt
Disable Security Center
Disable MSN Messenger
Disable System Restore
Disable Control Panel
Disable Desktop Icons
Disable Screen Saver
Hide Service Manager
Hide Outlook Express
Hide Windows Clock
Hide Desktop Icons
Hide All Process in Task Manager
Hide All Tasks in Task Manager
Hide Run in Start Menu
Change Explorer Caption
Clear Windows XP Password
Swap Mouse Buttons
Remove Folder Options
Lock Mouse & Keyboards
Mute Sound
Crazy Mouse
Allways CD-ROM Open
Turn Off Monitor (30 sec's)
Destroy Taskbar
Destroy Offlines (Y!Messenger)
Destroy Protected Strorage
Destroy Audio Service
Destroy Clipboard
Terminate Windows
Hide Cursor
Auto Startup
Restart-Logoff-Turnoff-Hibrinate Automatic After 30 minutes
Change Server Name After Install in Process
Change Server Name
Change XP Password
Change Computer Name
Change IE Home Page
Close Custom Windows
Disable Custom Service
Disable Process
Open Custom Website
Run Custom Command
Enable Convert To Worm - Auto Copy Server To Active Path With Custom Name & Time
Change Custom Icon For your created Virus (15 Icons)
NOTE
THIS IS A VIRUS MAKING SOFTWARE SO SOME ANTIVIRUS MAY DETECT IS AS A VIRUS BUT ACTUALLY IT IS NOT A VIRUS. SO DON'T WORRY.
CAUTION
DON'T TRY TO OPEN THE CREATED VIRUS ON YOUR OWN COMP.
Get adsense account List of Adsense Revenue Sharing Sites(How-tos)
In
the last post we have seen about how to start adsense revenue sharing
program on yousaytoo.com . Now i am going to tell you about some other
sites which also allows adsense revenue sharing program so you can also
earn through these sites too.
By taking part in the Adsense Revenue Sharing communities and websites, you have a great way to earn extra income. Often the Adsense revenue shared is between 50 and 100 percent for the content that you add to the specific site. This content could be in the form of a forum thread that you start, an article, a video or picture, a blog, or other types of content.If you spread your efforts across different sites, you could make some decent income. It is also an effective way of generating income for your own site by giving the visitors an incentive to contribute and keep returning.
By taking part in the Adsense Revenue Sharing communities and websites, you have a great way to earn extra income. Often the Adsense revenue shared is between 50 and 100 percent for the content that you add to the specific site. This content could be in the form of a forum thread that you start, an article, a video or picture, a blog, or other types of content.If you spread your efforts across different sites, you could make some decent income. It is also an effective way of generating income for your own site by giving the visitors an incentive to contribute and keep returning.
- AdSensigg – AdSensigg = AdSense + DIGG-like (interesting idea) – 50% Adsense Revenue Share
- Dosh Dosh – Invite only revenue sharing community – Unknown
- Free Ads with Adsense Revenue Sharing – Interesting link building venture – Unknown
- FunAdvice – Advice and answers site – Unknown
- Google Earth Hacks – Google Earth hacks forum – 75%
- Hub Pages Publish information on a topic you love to write about – 10% (oh boy!)
- Trend Hunter Report trends that you find – 100% New!
- Senserely Yours – An entire community based around sharing Adsense Revenue – Unknown
- That’s Pretty Dumb – Highlighting the stupidest things businesses do to us – 100%
- QooForum – A general forum about anything and everything – 50%
- Vubx.com – A gadgets article and blog site – 75%
- You Say Too – Revenue Sharing Community – 50%
- BlogEvolve - Blogging community – 50%
- Blogger Party – A blogging community that shares Adsense advertising revenue – 50%
- Bloggeries Blog Forum – A blog forum – 50%
- Writing Campus – Blogging community – 70%
- SoundChilds – Music sales, forum – 90-95%
- RateItAll – Consumer ratings and reviews – 50%
- Music Nerds – CD Review Site – 100%
- Private Rights Forum – Private label rights for audio and video – Unknown
- Article Codex – Free article repository – 50%
- Article Trader – Free articles for your site – 50%
- Articles Revenue – Write articles for them – 100% *reduced later unknown percentage
- DotNetSpider – Tutorial, articles, etc – 90%
- GuideDawgs.com – User submitted advice and guidance articles – 40 to 55%
- MeshPlex – Tutorial Database – 100%
- Scratch Projects - Write articles – $50 per article, plus 50%
- Share Your Expertise – An information sharing community – 100%
- Ad-Sensing.com – A forum on PPC advertising and more – 50%
- Digital Point Forums – Search Engine Optimization and Marketing forum – 50%
- Domain Name Portal – Domain name forum – 20-50%
- Free Forum Hosting – Forum hosting and support – 50%
- HTTPPoint – Webmaster forum, SERP and SEO forums – 50%
- International Domain Names – 50%
- Internet Marketing Forum – Marketing and advertising – 50%
- Name Pros – Buy, sell, and discuss domain names – 50%
- Revenue Source – Advertising discussion site – Unknown
- SEO Meeting – SEO, webmaster forum – 100%
- The Webmaster Forum – Webmaster forum – 50%
- Total Web Talk Forum – Webmaster forum – 50%
- Webdigity – SEO, webmaster, affiliate – 100%
- Webmasters.org – Webmaster forum – 100%
- Webmaster Talk – WMT.in is a webmaster discussion forum – 50%
- Webmaster-Talk.com – A webmaster discussion forum – 40/10%
- WebTalk Forums – WTF webmaster forum – 70%
- Whooked Forum - Webmaster, SEO, etc – 80%
- eFloor Plan – Home Improvement – 60%
- DotNetKicks.com – Microsoft .NET information, links, community – 50%
- Kick.ie – Tracking the best of the Irish web – 50%
- Value Investing News – Investor powered stock market news – 50%
- Google Knol – Wikipedia-like site by Google – 100%
- FriendTrain – social media site – Unknown
- Lensroll – Directory of Squidoo pages – 50%
- Squidoo - An excellent social media site – Shares revenue based upon various criteria *very good source of revenue!
- Qassia – Articles Submission and social media – 100% New!
- Tagfoot - Excellent social bookmarking site – 50%+ New!
- Xomba - Make posts, share links with other Xomba users – 50%
- Golf Nation – Golf, Golf, and more Golf – 75%
- I Gotta Rant – Sports, Music, etc – 50%
- The Sand Trap – More Golf – 50%
- Kernel Trap – Kernel development and news – 80%
- Scratch – Write Programming Tutorials for them – 50%
- SpiceFuse Forums General computer forum – 75%
- Tech Support Humor – Tech support humor site – 100%
- Technology Parent – Info for parents about technology – 50%
- Flixya – Share videos, photos, and blogs – 100%
- Free Range Stock – Stock photo directory – 80%
- Howcast - Video sharing – 50%
- Rever – Video sharing – 50%
- Stockvault.net – Photo directory for aspiring photographers – 100%
- TubeImage.com – Free image hosting – 100%
3D Ribbon Wrapped Text Effect(How-tos)

* the software used in this tutorial is Adobe Photoshop CS5 Extended
* the size of the final result image is 1024 * 768
* you might want to check the Basix Page to see some useful topics on dealing with Photoshop basics, such as loading palettes and some shortcuts.
Happy New Year!
To all textuts‘ readers, followers, subscribers, and fans. Thank you for making 2011 an amazing year with all your support.
Hope 2012 will be an awesome year for each and everyone of you.
Don’t forget to send me any notes, suggestions or ideas through the contact form.
Best regards,
Rose
.Hope 2012 will be an awesome year for each and everyone of you.
Don’t forget to send me any notes, suggestions or ideas through the contact form.
Best regards,
Rose
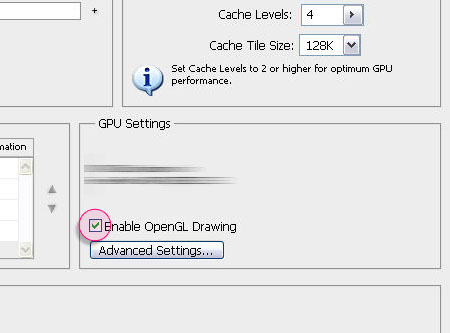
Enabling OpenGL
The Repoussé will not work unless OpenGL is enabled. So go to Edit -> Preferences -> Performance, and make sure Enable OpenGL Drawing (under GPU Settings) is checked.
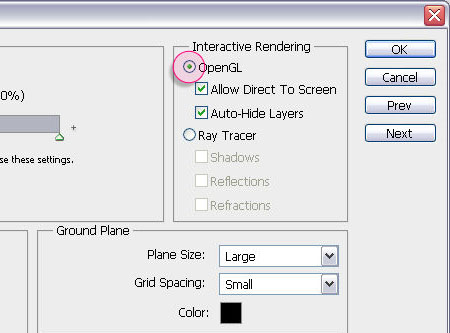
Also, go to Edit -> Preferences -> 3D, and make sure OpenGL (under Interactive Rendering) is enabled.
Step 1:
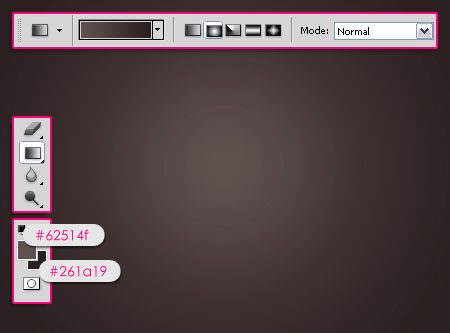
- Set the Foreground color to #62514f, and the Background color to #261a19, then, create a Radial Gradient from the center of the document to one of the corners.
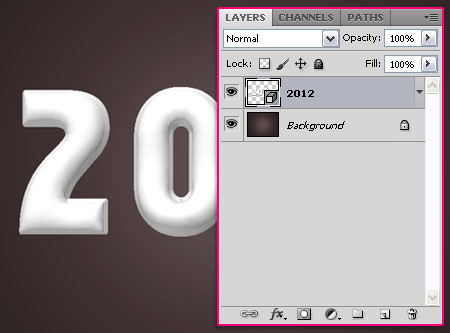
- Create the text in white color. The font used in Familian, and the size is 370 pt.

- Go to 3D -> Repoussé -> Text Layer.
A dialog box will appear telling you that this will rasterize the type layer, and you will no longer be able to modify your text. So if you are sure you don’t need to modify your text, click yes and continue.
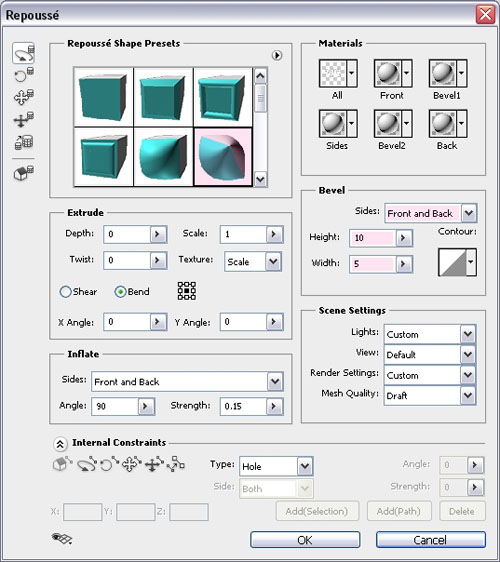
- Under the Repoussé Shape Presets, choose Inflate Sides. Then, under Bevel, choose Front and Back from the Sides drop down menu, set the Height to 10 and the Width to 5.
- This is what the text should look like.

- Notice also how the text layer’s thumbnail (icon) changes as the text is a 3D object right now.
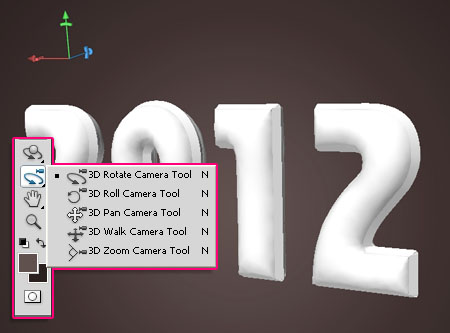
- In the Toolbox, select the 3D Rotate Camera Tool, and rotate the view of the 3D scene. You can use the other 3D Camera Tools as well until you like the angle of the camera. (Remember, we are changing the camera angle, NOT the object’s position.)
You can find some tips on how to use the 3D Camera Tools here.
Step 2:
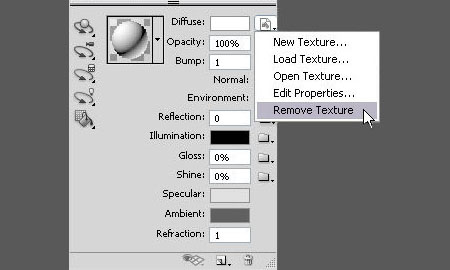
Next, we are going to modify the materials for the different sides of the 3D text. So open the 3D Panel (Window -> 3D), and expand the 3D object (click the arrow to its right) to view its different materials. Click each material name to modify its settings as shown below:
Note: You might need to Remove the Diffuse Texture for each one of the materials before assigning the new values.
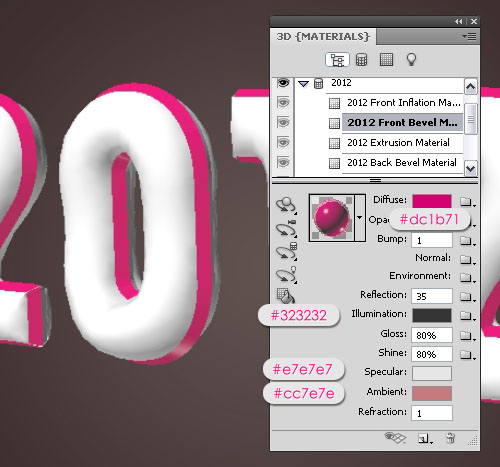
- Front Bevel Material: Change the Diffuse color to #dc1b71, the Reflection to 35, the Illumination color to #323232, the Gloss to 80%, the Shine to 80%, the Specular color to #e7e7e7, and the Ambient color to #cc7e7e.
- Back Bevel Material: Change the Diffuse color to #3e3e3e, the Reflection to 35, the Illumination color to #323232, the Gloss to 80%, the Shine to 80%, the Specular color to #e7e7e7, and the Ambient color to #000000.

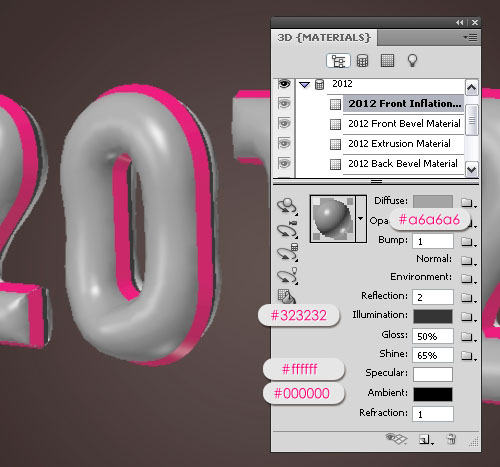
- Front Inflation Material: Change the Diffuse color to #a6a6a6, the Reflection to 2, the Illumination color to #323232, the Gloss to 50%, the Shine to 65%, the Specular color to #ffffff, and the Ambient color to #000000.
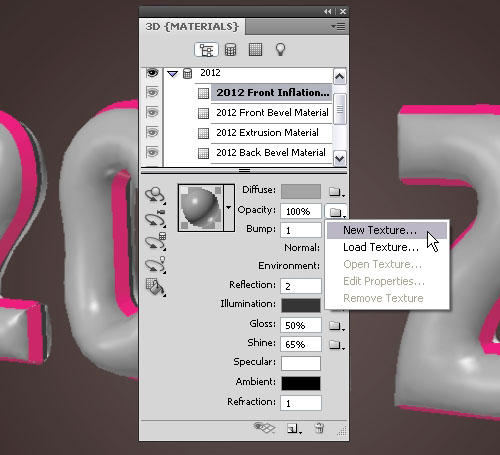
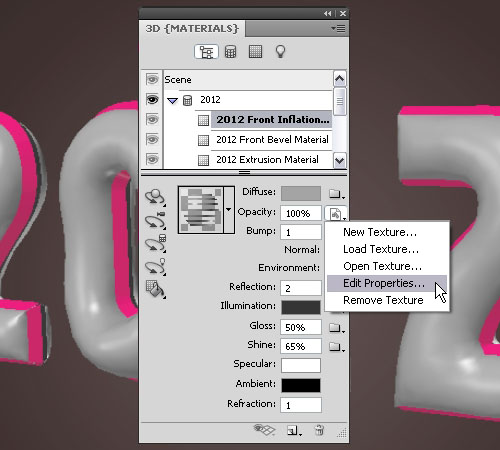
- Now, we are going to create the ribbon-like texture, using an Opacity Texture. So click the folder icon next to the Opacity option, and choose New Texture.
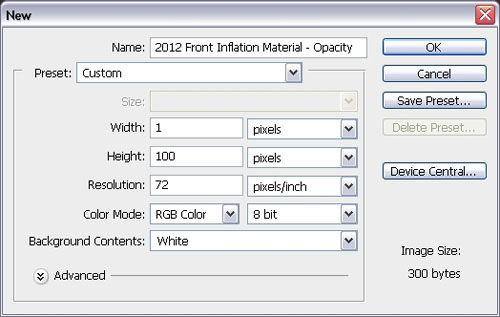
- Create a new 1 x 100 px document with a White background.
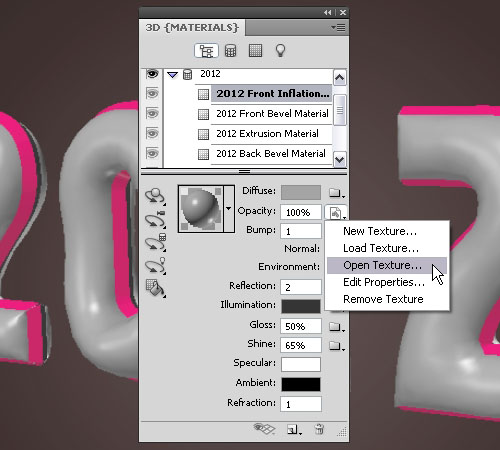
- The folder icon will become a Texture Map icon, click it and choose Open Texture.
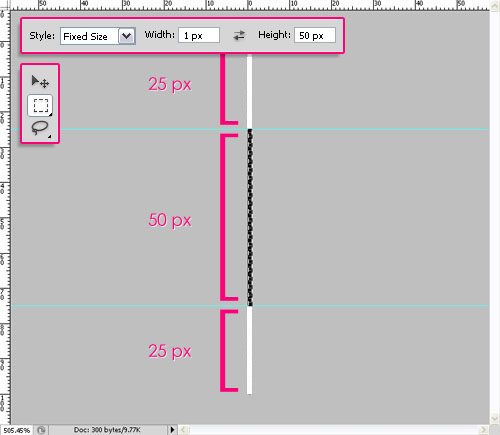
- Create a 50 px (Height) selection in the middle of the document and fill it with Black. This will leave a 25 px (Height) White areas in the top and the bottom of the document.
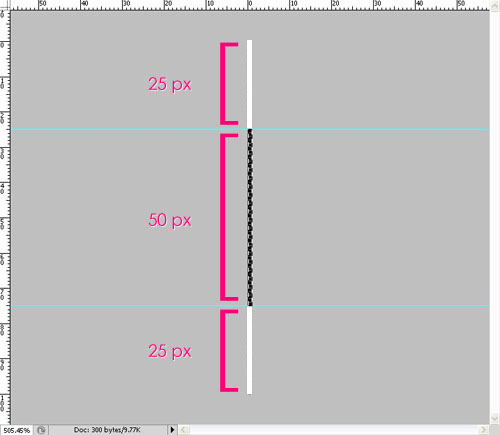
Tip: You can use a Fixed Size Rectangular Marquee Selection.
Save the changes, close the texture map file, and go back to the original document.
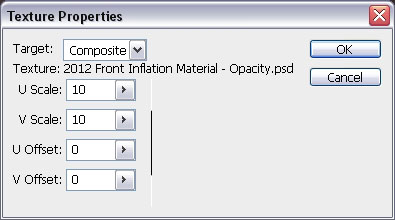
- Click the texture map icon and choose Edit Properties.
- Set both the U Scale and V Scale to 10.
- The trick here is that the White areas will create complete opacity and the Black areas will create complete transparency.

- Instead of repeating all these steps, you can save the material and re-apply it with one click. To do so, expand the Material Presets box, then, from the pop-up menu icon, choose New Material.
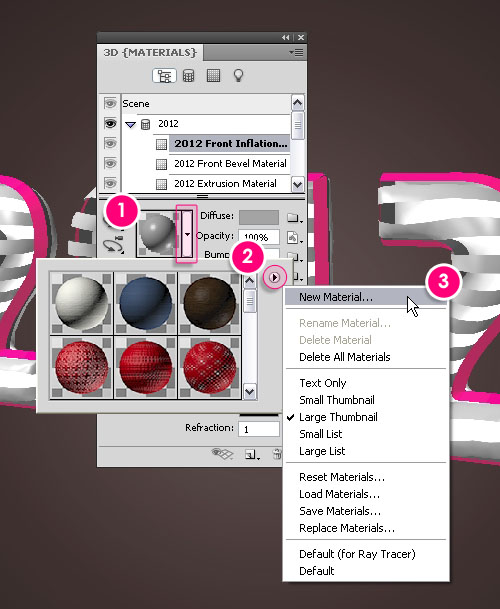
- Type in a name for the material and click OK.
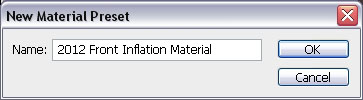
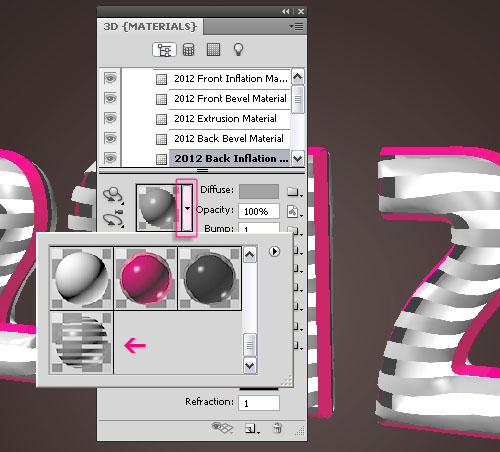
- Now, when you scroll down the Material Presets box, you’ll find the new material. Choose the Back Inflation Material and click the material you just saved to apply it to the Back of the 3D text.
Step 3:
- In the 3D Panel, click the Create a new light icon at the bottom, then choose New Point Light.
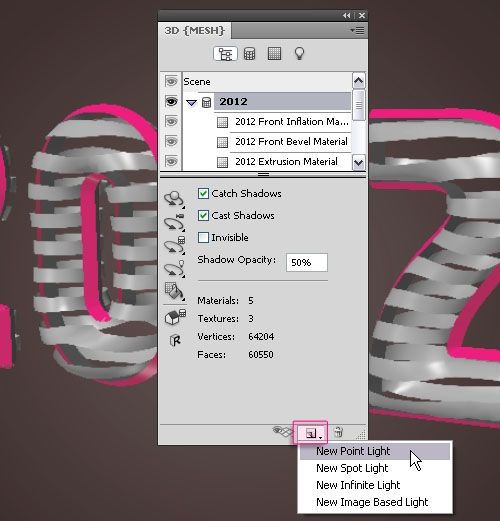
- This will enhance the overall lighting of the scene.

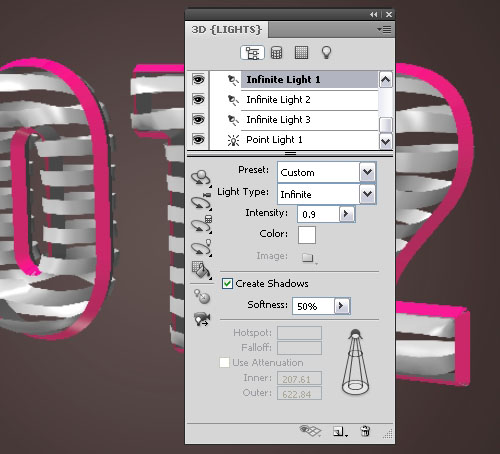
- Scroll down the Materials area to see the four lights you have and modify their settings.
- Infinite Light 1: Set the Shadow Softness to 50%.
(leaving the value at 0% will result in faster rendering, but the shadow edges will be hard. So if you have no problem with hard edges you can leave the softness at 0%.)
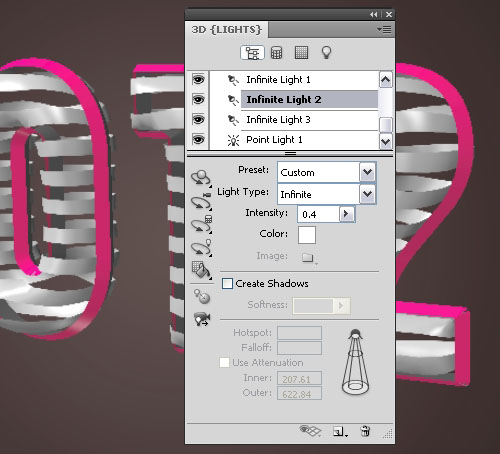
- Infinite Light 2: Un-check the Create Shadows box.
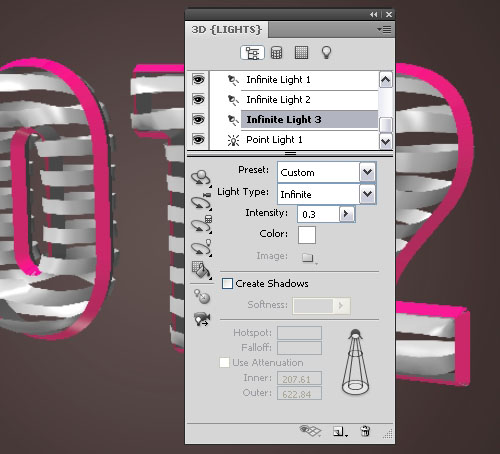
- Infinite Light 3: Un-check the Create Shadows box as well, we don’t want all four lights to create so many different shadows.
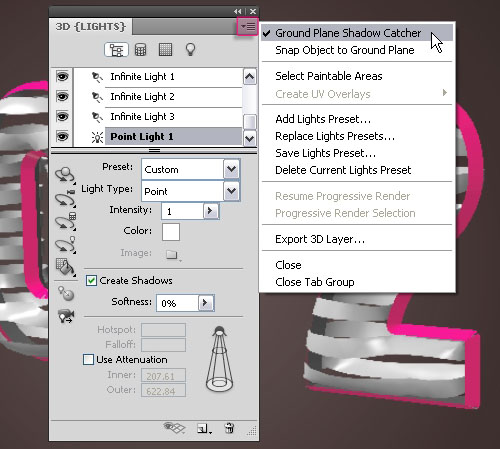
- Point Light 1: The default settings are good.

- In order for the shadows to be rendered on the ground without the need to create a surface or a plane, click the pop-up menu arrow in the top right corner of the 3D Panel, then click the Ground Plane Shadow Catcher option.
- Once you’re done creating the scene, it’s time to render it. Click Scene at the top of the 3D Panel, then choose Ray Traced final from the Quality drop down menu.
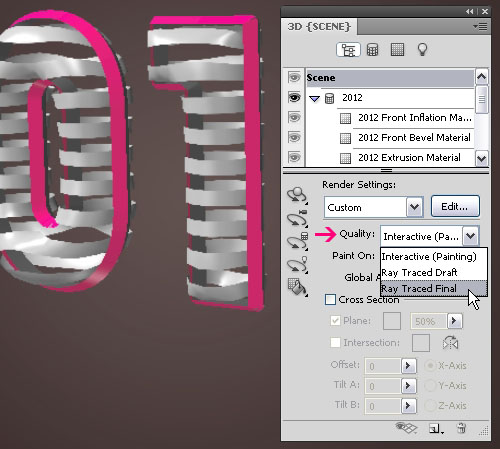
- The rendering process might take a couple of hours, but you can click anywhere inside the document to stop rendering whenever you want.

Step 4:
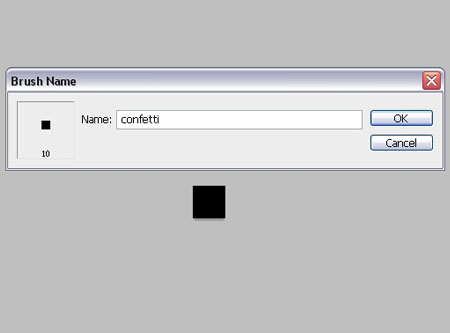
- To create the confetti brush, create a new 10 x 10 px document, and fill it with Black. Then go to Edit -> Define Brush Preset, and type in a name for the brush. Close this document and go back to the original one.
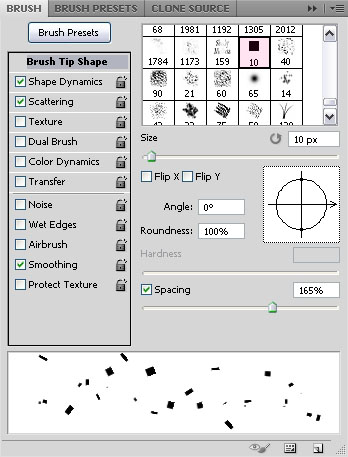
- Open the Brush panel (Window -> Brush), choose the square brush you’ve just created, and modify its settings as shown below:
- Brush tip Shape:
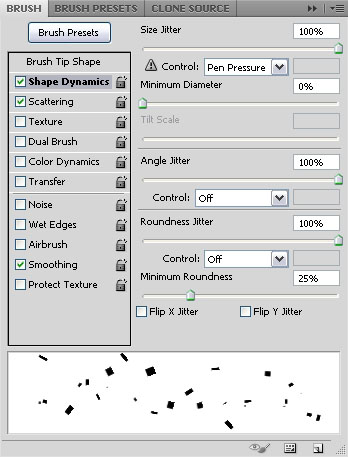
- Shape Dynamics:
- Scattering:
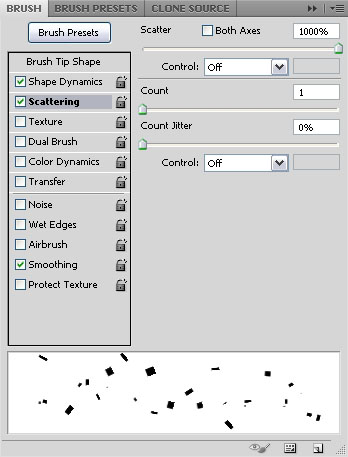
- Create a new layer on top of all layers and call it “Confetti”.
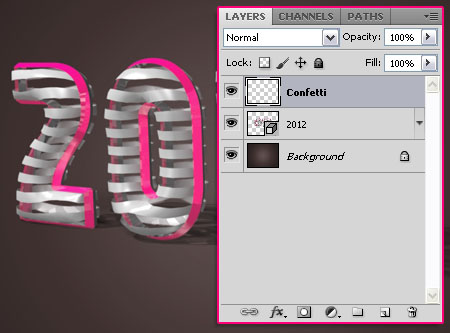
- Duplicate the “Confetti” layer, and drag the copy right below the 3D text layer.
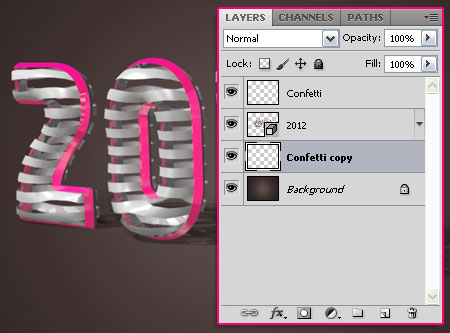
- Select the original “Confetti” layer, and use the brush to scatter some confetti in the upper part around the text. Do not add any near the ground, as we are going to apply different shadow settings for the confetti on the ground.

- Click the “Confetti copy” layer and fill the lower area with confetti.

Step 5:
Double click the “Confetti” layer to apply the following Layer Styles:
- Drop Shadow: Change the Opacity to 15% and the Distance to 30.

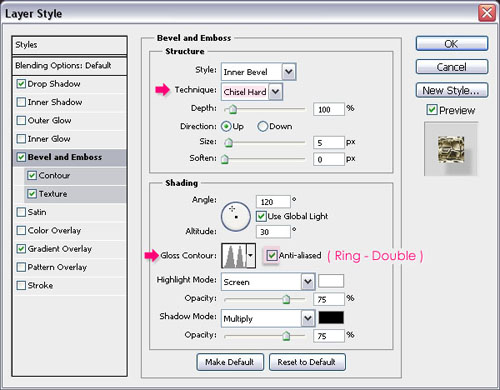
- Bevel and Emboss: Change the Technique to Chisel Hard, the Gloss Contour to Ring – Double, and check the Anti-aliased box.
- Contour: Choose the Cove – Deep Contour.
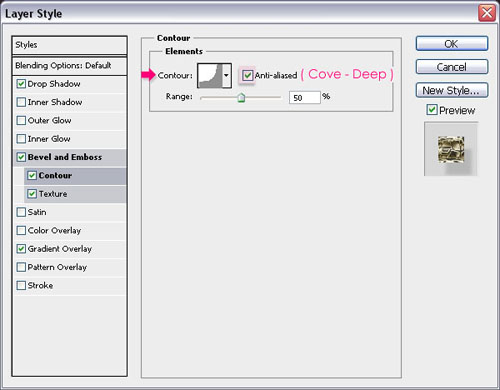
- Texture: Choose the Metallic Snakeskin Pattern.

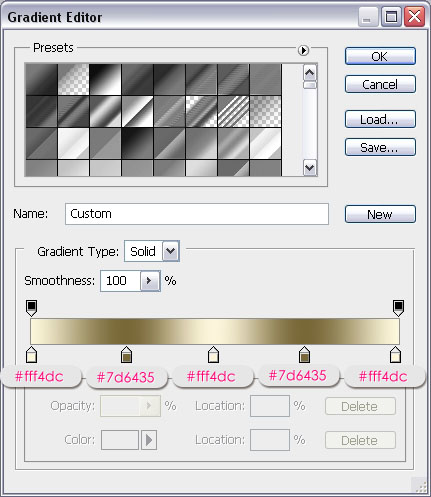
- Gradient Overlay: Set the Style to Reflected, and click the Gradient box to create the gradient.
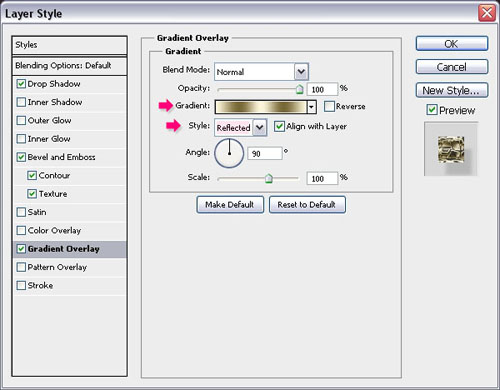
- The Gradient uses two colors: #fff4dc and #7d6435. But you can create other gradients using whatever colors you want.
- This is what you should get.

- Notice that the shadow of the confetti floating in the air is far from the text and the ground, but that can’t be the case for the confetti touching the ground. So copy and paste the Layer Style to the “Confetti copy” layer (Right click on the “Confetti” layer, choose Copy Layer Style, then right click on the “Confetti copy” layer, and choose Paste Layer Style.).
Then, double click the “Confetti copy” layer to modify the Drop Shadow, by setting the Opacity to 50%, and the Distance to 5.
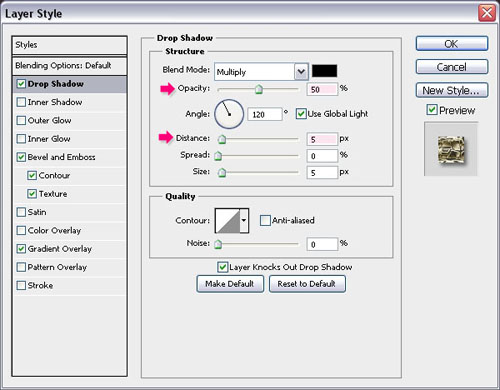
- This will add a darker and closer shadow for the confetti on the ground.

And that’s it! Hope you enjoyed the tutorial.


