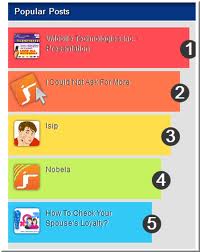
Making your blog look interesting and catchy is one of the most important thing. Adding a colorful popular posts widget is a nice option to make your blog look more beautiful and eye catching. By default, blogger allows you to add a popular posts widget however, in this article you will be able to add a multicolored widget displaying popular posts of your blog.
The widget script comes with three display options i.e. display only titles of post, titles with thumbnails or just thumbnails. Follow below mention steps to add a widget.
Add a Colorful Popular Posts Widget on Blogger
- Go to Your Blog Template > Edit HTML > Proceed and check "Expand Widget Templates"
- Find this code
- Place this code
- Now, find this code
- Place new code just before/above it.
- Find this code
- Paste the code shown below just below/after it
- Save Your Template
/* Variable definitions
====================
<Group description="PopularPosts Backgrounds" selector="#PopularPosts1">
<Variable name="PopularPosts.background.color1" description="background color1" type="color" default="#fa4242" value="#ff4c54"/>
<Variable name="PopularPosts.background.color2" description="background color2" type="color" default="#ee6107" value="#ff764c"/>
<Variable name="PopularPosts.background.color3" description="background color3" type="color" default="#f0f" value="#ffde4c"/>
<Variable name="PopularPosts.background.color4" description="background color4" type="color" default="#ff0" value="#c7f25f"/>
<Variable name="PopularPosts.background.color5" description="background color5" type="color" default="#0ff" value="#33c9f7"/>
<Variable name="PopularPosts.background.color6" description="background color6" type="color" default="#ff0" value="#7ee3c7"/>
<Variable name="PopularPosts.background.color7" description="background color7" type="color" default="#ff0" value="#f6993d"/>
</Group>
]]></b:skin>
#PopularPosts1 ul{margin:0;padding:5px 0;list-style-type:none}
#PopularPosts1 ul li{position:relative;margin:5px 0;border:0;padding:10px}
#PopularPosts1 ul li:first-child{background:$(PopularPosts.background.color1);width:90%}
#PopularPosts1 ul li:first-child:after{content:"1"}
#PopularPosts1 ul li:first-child + li{background:$(PopularPosts.background.color2);width:85%}
#PopularPosts1 ul li:first-child + li:after{content:"2"}
#PopularPosts1 ul li:first-child + li + li{background:$(PopularPosts.background.color3);width:80%}
#PopularPosts1 ul li:first-child + li + li:after{content:"3"}
#PopularPosts1 ul li:first-child + li + li + li{background:$(PopularPosts.background.color4);width:75%}
#PopularPosts1 ul li:first-child + li + li + li:after{content:"4"}
#PopularPosts1 ul li:first-child + li + li + li + li{background:$(PopularPosts.background.color5);width:70%}
#PopularPosts1 ul li:first-child + li + li + li + li:after{content:"5"}
#PopularPosts1 ul li:first-child + li + li + li + li +li{background:$(PopularPosts.background.color6);width:65%}
#PopularPosts1 ul li:first-child + li + li + li + li + li:after{content:"6"}
#PopularPosts1 ul li:first-child + li + li + li + li + li +li{background:$(PopularPosts.background.color7);width:60%}
#PopularPosts1 ul li:first-child + li + li + li + li + li + li:after{content:"7"}
#PopularPosts1 ul li:first-child:after,
#PopularPosts1 ul li:first-child + li:after,
#PopularPosts1 ul li:first-child + li + li:after,
#PopularPosts1 ul li:first-child + li + li + li:after,
#PopularPosts1 ul li:first-child + li + li + li + li:after,
#PopularPosts1 ul li:first-child + li + li + li + li + li:after,
#PopularPosts1 ul li:first-child + li + li + li + li + li + li:after{position:absolute;top:20px;right:-15px;border-radius:50%;background:#353535;width:30px;height:30px;line-height:1em;text-align:center;font-size:28px;color:#fff}
#PopularPosts1 ul li .item-thumbnail{float:left;border:0;margin-right:10px;background:transparent;padding:0;width:40px;height:40px}
#PopularPosts1 ul li a{font-size:12px;color:#444;text-decoration:none}
#PopularPosts1 ul li a:hover{color:#222;text-decoration:none}
<b:section class='sidebar' id='sidebar' preferred='yes'>
<b:widget id='PopularPosts1' locked='false' title='Popular Posts' type='PopularPosts'>
<b:includable id='main'>
<b:if cond='data:title'>
<h2><data:title/></h2>
</b:if>
<div class='widget-content popular-posts'>
<ul>
<b:loop values='data:posts' var='post'>
<li>
<b:if cond='data:showThumbnails == "false"'>
<b:if cond='data:showSnippets == "false"'>
<a expr:href='data:post.href' expr:title='data:post.title' rel='bookmark'><data:post.title/></a>
<b:else/>
<a expr:href='data:post.href' expr:title='data:post.snippet' rel='bookmark'><data:post.title/></a>
</b:if>
<b:else/>
<b:if cond='data:showSnippets == "false"'>
<b:if cond='data:post.thumbnail'>
<img class='item-thumbnail' expr:alt='data:post.title' expr:src='data:post.thumbnail'/>
<b:else/>
<img alt='no image' class='item-thumbnail' src='https://blogger.googleusercontent.com/img/b/R29vZ2xl/AVvXsEgN3_Bp7W6tc1vXg3BV0HwFHnBzUQXTJ67CgqFSiJm_VeAtUTpMFfFAxkQF6xcQGJL8-HQwLN6uXgaiTzc5YM5x_mKM2xX51ZnSxonqrHoO5vklcXIHrDcXKuhrgY6SLG0QdjkQFC81tlQ/s1600/defaultimage.jpg'/>
</b:if>
<a expr:href='data:post.href' expr:title='data:post.title' rel='bookmark'><data:post.title/></a>
<div class='clear'/>
<b:else/>
<b:if cond='data:post.thumbnail'>
<img class='item-thumbnail' expr:alt='data:post.title' expr:src='data:post.thumbnail'/>
<b:else/>
<img alt='no image' class='item-thumbnail' src='https://blogger.googleusercontent.com/img/b/R29vZ2xl/AVvXsEgN3_Bp7W6tc1vXg3BV0HwFHnBzUQXTJ67CgqFSiJm_VeAtUTpMFfFAxkQF6xcQGJL8-HQwLN6uXgaiTzc5YM5x_mKM2xX51ZnSxonqrHoO5vklcXIHrDcXKuhrgY6SLG0QdjkQFC81tlQ/s1600/defaultimage.jpg'/>
</b:if>
<a expr:href='data:post.href' expr:title='data:post.snippet' rel='bookmark'><data:post.title/></a>
<div class='clear'/>
</b:if>
</b:if>
</li>
</b:loop>
</ul>
</div>
</b:includable>
</b:widget>
Settings
- Now got o Page Element You will find out a popular widget
- Click on the edit link of Popular Posts widget
- Select “Display Up To 7 Posts”
- Now Save the widget
How to Change the color scheme
If you want to change the color scheme, Go ToDesign → Template Designer → Advanced → PopularPostsBackground
and select the colors you want.


Post a Comment